🏊♂️ Dive into safety with style!
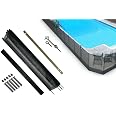
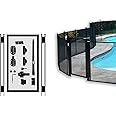
The Pool Fence DIY by Life Saver Fencing is a removable, mesh safety fence designed to protect against accidental falls into swimming pools. Standing at the recommended height of 4 feet, each 12-foot section is pre-assembled for easy installation, requiring only a rotary hammer drill. Made from durable aluminum, this stylish black fence not only enhances safety but also adds a sleek touch to your outdoor space.
| Material | Aluminum |
| Color | Black |
| Brand | Life Saver Pool Fence |
| Style | Section Kit |
| Product Dimensions | 48"L x 144"W |
| Assembly Required | Yes |
| Number of Pieces | 12 |
| Unit Count | 48.0 Sq Ft |
| UPC | 741360781641 |
| Global Trade Identification Number | 00741360781641 |
| Manufacturer | Life Saver Pool Fence Systems, Inc. |
| Part Number | V110P-5 |
| Item Weight | 12.98 pounds |
| Country of Origin | China |
| Item model number | V110P-5 |
| Is Discontinued By Manufacturer | No |
| Size | 48" x 12' |
| Item Package Quantity | 1 |
| Included Components | Required Deck Sleeves/Caps, Pre-Assembled 4' X 12' Section Of Fence, Stainless Steel Or Brass Safety Latch, Life Saver V110P-5 Diy Pool Fence Section, Template |
| Batteries Included? | No |
| Batteries Required? | No |
A**E
Good investment, easy install, very sturdy, 100 year warranty
There are cheaper options out there, but we went with the best reviews. This is the same brand contractors install in my area so we went with the DYI option. This kit was PERFECT. It comes with very detailed directions which include descriptions, pictures, templates, and trouble shooting. If all else fails, there is a phone number and you get in touch with a real person. The fence is very sturdy and adds such a huge peace of mind. We can have our toddler on the patio without fear of the pool or accidents. I would recommend this product to ANYONE. It is an investment and it is absolutely worth it.
M**E
Simple & Sturdy
This is very easy to install, and the fence is good and sturdy.I bought 10 sections of fence (as well as the gate) and from first getting the product out the box to having the gate leveled and adjusted took about 8 hours. That included the time to actually read the instructions and plan out the fence route.The drilling base is essential, and also sturdy. The bullseye system and leveling bolts work fine, there are two bushings in it so the drill bit rotates freely, and you need to put some angle on the fence posts, depending on the shape of your pool. If you have a square pool, then you could get by without the base, but if you have some curved shape to your pool, then you set the posts at a slight tilt in order to get the right tension on the posts. I would not want to try doing that drilling without the guide. You need an 18" bit in order to get deep enough into the pool deck with the drilling guide.The gate was probably the most complicated bit of the installation, but still easy enough to do.Even with buying a Bosch rotary drill specifically for this job, 18" long 5/8" drill bit and the guide base I paid about a quarter of what I got quoted for this job.
C**N
Fantastic Fence, a Couple of Suggestions
I agree with all positive reviews. This is an amazing, high quality product. As mentioned in other reviews, rent a 1" minimum impact drill if you don't have one. I'd recommend a 2" to get through concrete like butter and make your holes pristine. The fence is more forgiving than I expected, but the light lean/heavy lean instructions are really helpful in making a nice looking install. I also agree that the drill guide is a must and the longer bit is crucial. I had a bit of trouble getting the pole sleeves in the concrete a couple of times, but it was because I hadn't gone through the hole with the drill a couple of extra times to get all of the bottom edges out. Another note, the printed instructions that come with a fence section do not match the online instructions. The paper version indicates that you should make the end pole holes for each section slightly closer to the second to last pole holes which gives you just a bit more slack when putting in and taking out the ends of each fence. Lastly, instead of hitting the sleeves into the drilled holes by putting something on top of the sleeve (like a piece of wood), I had good success in banging them in with an actual fence pole by inserting it into the sleeve and banging it down. This supports the tube so that you don't bend the top of the sleeve in a really tight hole. They are surprisingly expensive to replace. This is an excellent product, and I highly recommend it. I happen to be installing it the day after a close friend had a visiting child go to the hospital after falling into his pool. If you're hesitating, I can't encourage you enough to pull the trigger on this or some solution. I'd be happy to talk through my experience to decrease the intimidation factor.
M**I
Just installed
I just installed this fence. I thought it would be easy... turns out that it was unbelievably easy. I didn't get the guide because I'm cheap. I used a bullet level and a 14"drill bit, set up the bit so it was plumb(ish), and drilled away, trying to make it as straight as possible. This worked ok. Some of the pegs are slightly crooked, but not noticeable unless someone is being nitpicky about it. If you don't have someone to help you, and if you are doing a long stretch and doing corners and stuff, save yourself the trouble and get the guide. My area was small, so I only had to drill 10 holes to install 24' of fence. One side butted up to a block wall, the other side butted up to the aluminum framing of the screened pool cage. I was able to use 1" EMT conduit straps with appropriate hardware to secure these ends (sold separately).You can use it without the gate. There are instructions within the installation instructions that tell you how to do this. However, I just went one peg back from the end, drilled a hole, and am able to roll up that section and insert into the hole. You'll understand what I mean if you read through the instructions.A regular HAMMER drill worked fine--but as I said before, I only had to drill 10 holes. I bought a rotary hammer with a drill function specifically for this project, but didn't realize that it needed special SDS bits. Regular masonry bits wouldn't fit into the chuck. You may want to check on this before going out and buying a rotary hammer drill for this project. Unless you have a lot of holes to drill, a hammer drill will work just fine.The instructions weren't great, but if you have any handy skills whatsoever, it's not a difficult install. I'm not completely confident that it will hold up to the elements, but I think that's something time will tell. I did read some comments that said it was "flimsy" or "cheap". If you set it up right and tight, it looks pretty sturdy. The fact that it doesn't have a toprail makes it both easy to store/ship, and difficult to climb. It's not going to keep trespassers off your property, but it oughta keep your kid busy trying to climb it long enough for you to catch him/her.
Trustpilot
2 weeks ago
1 month ago