🚀 Elevate Your Creativity with Precision Printing!
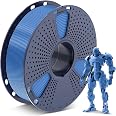
The TwoUp v3 3D Printer Kit offers a spacious build area of 7" x 7" x 5" and features cutting-edge technology for superior print quality. With a 50-micron layer resolution and speeds of up to 100mm/s, this printer is designed for both efficiency and ease of use, making it perfect for professionals and hobbyists alike.
A**D
Worth it if you like to learn by mistake and the community at fabric8r +1 year update
It's an okay 3D printer. after you calibrate, heat up. print, calibrate...etc etc. I got this because it was a cheap printer kit and I wanted to learn the mechanics of it. It's definitely a pain in the ass to get a proper print. Though I still have most of mine, it's been turned into a franken printer with some upgrades and a homemade enclosure.1 year UPDATE:So it has been one year since I have gotten this printer. Since then I have come to know that Quintessential Customer support needs a COMPLETE overhaul. It's almost like a bunch of 5yr olds throwing parts in a bin with 0 quality control and double checking.The printer itself is cheap for what you are getting. The parts alone would cost more than buying this kit. With that said, it is definitely for the person who like to play with stuff and fix it when it's broken. From what I understand the new kits come with the RAMPS 1.4 board, which is a nice upgrade from the PrintrBoards. You'll get okay resolution with the stock extruder but it would be best to upgrade to the E3D or a clone of it. The PrintrBoard ended up dying on me a few months old so I bought a RAMPS 1.4 myself. The power supply was also sub-par, especially if you want to add a hotbed. I used an old computer 350watt PSU and haven't had an issue since.The community is pretty good on the forums fabric8r.com/forums if you're interested.Final line: get it if you want to save money buying parts. Get it if you like to tinker with stuff. DO NOT get it if you want something that works right out of the box.~Good Printing.
M**R
Shut up and take my money
In terms of value, this is without a doubt the best printer you can buy.However, as others have said, this is not plug-and-play. This is a printer for DIY'ers. Some have complained that the assembly is awful - but it all depends on your skill level. There are a LOT of pieces in the kit, probably 150+. The assembly manual is 67 pages long, if that helps you understand exactly how "unassembled" this printer comes. Expect the assembly to take 4-6 hours, a couple evenings of your time.Personally I found it not too much more difficult that putting together a large, complex Lego or Knex model. The assembly manual PDF is FANTASTIC although it is a little outdated, a handful of parts have changed since the manual was written. If you see something in the manual that doesn't exactly match what you've got, don't get worked up. Use glue *only* where suggested in the manual. Once you have it assembled, you may find some slop in parts - use glue only where needed to true things up.Things I used for my install- a whole pile of metric allen wrenches- sandpaper- triangular file for enlarging holes in MDF- super glue- lots of zip-ties (more than the kit came with - buy more)- double-sided tape for holding the x-carriage belt (this was later replaced with hot glue)My kit was complete with no missing pieces, so that was great. I did have a few hiccups though. One of the MDF parts for the extruder bearing tensioner was cut from what appeared to be a little bit thicker MDF, so I had to sand it down to match the thickness of a mating part. Some of the laser-cut MDF pieces didn't match up with holes/tabs exactly either, so I had to file some of the openings a little larger. Also, my extruder gear had a few broken teeth on it out of the box. QUBD was fairly quick to replace it. I also did not have a fan mount, but this was easily rigged up with some zip-ties.Once assembled, you have a working and *fair* quality 3D printer. This is the product objective - get you working, so you can print some parts. There are a multitude of excellent 3D printable upgrades mentioned in the manual and on Thingiverse. Once you get the upgrades printed and installed, you have a VERY GOOD quality 3D printer, right up there in quality with machines costing 5 or 10 times as much.If you want to learn every aspect of how a 3D printer works, this is definitely the kit to buy. The great thing about building something yourself is, when it breaks, you usually know how to fix it. The Fabric8r forums are a good resource if you need help.
Q**S
I did not go into this expecting some amazing printer, or something that would make things that ...
From the very beginning, there were red flags. I did not go into this expecting some amazing printer, or something that would make things that look like they were injection molded. But I was still incredibly disappointed, frustrated, and angry. Some of the parts were not the correct size. Rods didn't fit into the bearings, holes were not drilled with the proper alignment, a linear bearing even had its bearings falling out. They sent me a couple new rods and bearings, but even the replacements didn't roll smoothly and stuck a lot. I didn't feel like wasting more time with getting yet another replacement.The mdf material this is made of cracked in several places during assembly, since the 'laser cut' (apparently not precision cut) pieces didn't quite line up. After a few replacement pieces, and finally completing the build, the first big problem was the X gantry sags. A LOT. As the print head moves around, the right side raises and lows, since it has no support. It sags so much, that I was unable to fully compensate for it even with totally raising one side of the bed and completely lowering the other. I did eventually purchase the heated bed from QUBD, hoping that would help some of the other issues it was having, but it didn't. They actually didn't even send me all of the parts that were supposed to come with the heated bed, and the bed has a crack in it, and after 6 days, I still have no response from them.But back to this travesty of a printer. As the gantry sags, you can see the top support sway, which throws it off even more. No matter how tight the screws are, there always seems to be play in the parts.The software that was loaded onto it when I received it did not work properly, and had the X and Y axises mirrored, and one of the motors had different colored wiring than the others, adding to the confusion of building, since this is the 'new' version, which apparently has very little support out there and the instructions had several spots that did not match the parts in the kit. I tried flashing the marlin firmware, and eventually found a firmware on the qubd site that did get it to actually print, in that it would move in approximately the appropriate motions, but still with all sorts of errors.The Y belt is never able to get quite tight enough, without modification of the pieces that hold it, so as it prints, it introduces more and more shifting in the Y direction.The X motor has always made a sort of grinding noise, and jumps a lot when making small movements, the extruder gear is not actually round (or the hole is drilled off-center) causing the filament to either not have enough tension to be pushed through, or too much tension and it tears it up or skips back, with every revolution.The Z motor is now skipping any time it moves more than one or two steps, and just lightly hums, so when the extruder is lifted to heat up, then goes down to start a print, it has to be manually moved back down to the correct location.The bed (non-heated) is not actually flat. It seemed to have a bulge in one spot, slightly off center, and no matter how often I leveled it, it would not allow me to use the full size of the bed without print errors.I have spent a month looking on forums, getting advice, and even had someone with much more 3d printing experience come over, but all to no avail.If the print speed is anything about around 20mm/s, I don't even get something that will resemble the model, and even with it going slow, the extrusion rate has to be cranked way up, which causes all sorts of deformations.The extruder PEEK (the cylinder insulator that basically holds the extruder to the carriage) has never fit properly into the 'mounting' and generally sits about 2-3 degrees off of vertical, causing smears and eventually ruining the layers. I have rebuilt this thing 5 times so far, and the extruder at best sits off-kilter, and generally shakes itself loose and will actually wobble around as it moves.Anything that is printed higher than about 5-7 layers starts gettings holes, spirals, gaps, missing layers, etc.This has been a nearly wasted month. I say nearly, because I did learn that I will not use a printer with a single z motor, made from mdf, or that is the 'cheapest'. I just hope that I can get my return approved, I would even settle for Amazon credit at this point.
C**T
Built it with out much problem, although the instructions ...
Built it with out much problem, although the instructions are vague and not very helpful. But it will not run, and the board get burning hot. Hopefully, I will be able to get it working.
Trustpilot
1 month ago
3 weeks ago